Making Your Own Homemade Preserves with Metcalfe Harvests

Imagine a kitchen counter covered in slightly bruised peaches or a basket of berries that have seen better days. Instead of tossing them, you reach for a jar, some sugar, and a heavy-bottomed pot. This post explains how to turn your seasonal harvests into long-lasting preserves, specifically focusing on the produce found right here in the South Ottawa area. You'll find the right equipment, the basic steps for canning, and tips for making sure your jars stay shelf-stable through the winter.
Metcalfe is lucky. We live in a pocket of Ontario where the soil is rich and the seasonal shifts are dramatic. One week you're picking fresh strawberries, and the next, you're dealing with the heavy harvests of late-summer tomatoes and cucumbers. Making your own preserves isn't just a hobby; it's a way to make sure those flavors stick around long after the first frost hits.
What Equipment Do I Need for Canning?
You need a combination of specialized canning tools and standard kitchenware to start your preserving journey. While you don't need a professional laboratory, using the right gear prevents accidents and ensures your food stays safe to eat.
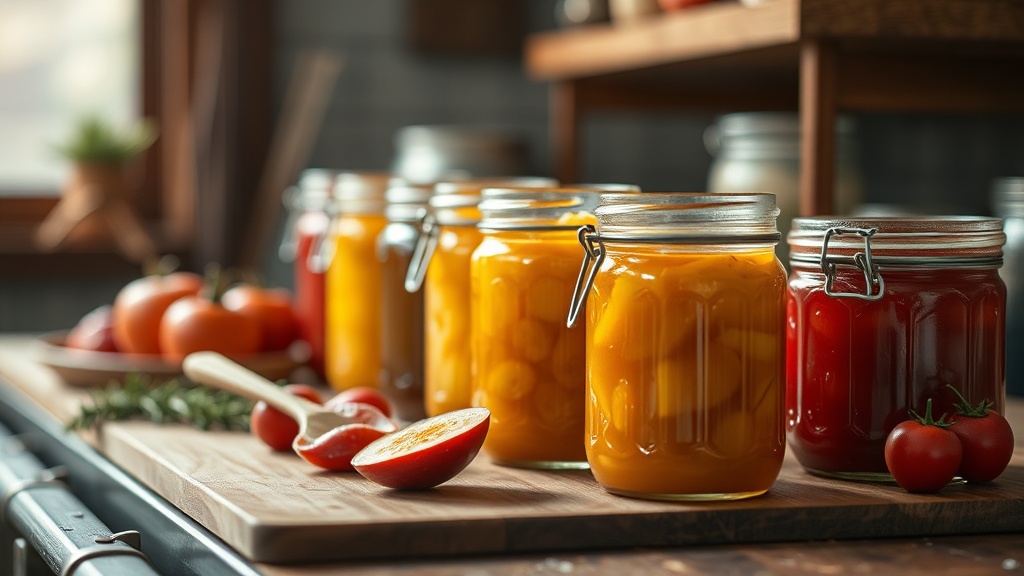
For beginners, I highly recommend starting with a water bath canning method. It's much simpler than pressure canning and works perfectly for high-acid foods like fruits and jams. You'll want to pick up a few specific items from a local kitchen supply store or even a reliable brand like Ball or Bernardin.
- A Large Pot: It needs to be deep enough to cover your jars by at least an inch of water.
- Jar Lifters: These are long-handled tongs designed to grab hot glass without breaking it (or burning your fingers).
- Canning Funnels: These sit on top of your jars to keep the rims clean.
- Bubble Remover: A small spatula or specialized tool to get air out of the jars.
- Measuring Spoons and Scales: Precision is everything when dealing with sugar-to-fruit ratios.
If you're working with low-acid vegetables like green beans or peppers, you'll need a pressure canner. This is a different beast entirely. For high-acid items like jams or pickles, the water bath method is your best friend. It's much less intimidating for a first-timer.
Before you start, make sure you've checked your garden's health. If you've been building a backyard garden that thrives in South Ottawa soil, you likely have an abundance of produce ready for the pot. A healthy harvest makes for much better preserves.
How Much Sugar and Acid is Required for Safety?
Safety in canning relies on maintaining a specific level of acidity and sugar to prevent the growth of bacteria. You can't just guess these amounts; you have to follow a tested recipe to ensure the food is shelf-stable.
The reason we add lemon juice or citric acid to many recipes is to lower the pH level. Bacteria—especially Clostridium botulinum—struggle to grow in highly acidic environments. If you're making a fruit jam, the sugar acts as a preservative, but the acid is what does the heavy lifting. It's a science, not a suggestion.
For more detailed safety standards, you should always consult the Government of Canada food safety guidelines. They provide the baseline for what is considered safe for home consumption. Never skip the acid step when making low-acid foods like pickles or certain vegetables.
Here is a quick reference for common ratios:
| Type of Preserve | Primary Acid Source | Typical Storage Method |
|---|---|---|
| Fruit Jam/Jelly | Lemon Juice / Fruit Pectin | Water Bath Canning |
| Pickles | Vinegar (at least 5% acidity) | Water Bath Canning |
| Low-Acid Veggies | Vinegar (High concentration) | Pressure Canning |
How Do I Know if My Jars are Properly Sealed?
A properly sealed jar will have a concave lid that doesn't move when you press the center. If the lid pops or makes a clicking sound when pressed, the vacuum seal failed, and you shouldn't keep that jar in your pantry.
When you finish the hot water bath, you'll lift the jars out with your jar lifter and set them on a towel. Let them sit undisturbed for 12 to 24 hours. This is the most nerve-wracking part! You'll see the lids "pop" down as they cool. That sound is the vacuum being created. If a lid is flat or moves under pressure, it didn't seal. Don't throw it away immediately—just move it to the fridge and eat it soon.
It's worth noting that even a perfect seal doesn't mean the food will last forever. Once you open that jar, the clock starts again. Keep your opened jars in the fridge and use them within a few months. If you've been learning how to keep your local farmers market haul fresh longer, you'll appreciate the extra time these preserves give you.
Don't be afraid of a little bit of failure. If your first batch of strawberry jam doesn't set perfectly, it still tastes great on toast. It's just a "refrigerator jam" now instead of a "pantry jam."
The Basic Process: A Step-by-Step Guide
While every recipe is different, the general workflow for making preserves follows a predictable pattern. Whether you are working with berries from your backyard or apples from a local orchard, the steps remain largely the same.
- Sanitize Everything: Wash your jars in hot, soapy water and keep them warm. You don't want a cold jar hitting a hot liquid, or it might crack.
- Prepare the Produce: Wash, peel, and chop your fruit or vegetables. If you're making jam, you'll likely be cooking the fruit with sugar and pectin first.
- The Boil: Bring your mixture to a full, rolling boil. This is where the magic happens. The heat kills most surface bacteria and begins the reduction process.
- Fill the Jars: Use your canning funnel to fill the jars, leaving about a half-inch of "headspace" at the top. This space is vital for the vacuum to form.
- Wipe the Rims: This is a tiny step that people often forget. If there is even a speck of sugar or juice on the rim, the lid won't seal properly. Wipe it with a clean, damp cloth.
- The Water Bath: Submerge the jars in the boiling water bath for the exact time specified in your recipe.
- The Cooling Phase: Remove the jars and let them sit. No touching! No moving! Let them do their thing.
The amount of sugar you use can actually affect the texture. Too much sugar can make a jam too hard, while too little might result in a runny mess. If you're working with local ingredients, the natural sugar levels can vary from year to year. Be prepared to adjust your recipe slightly based on the sweetness of the fruit you've actually harvested.
One thing to keep in mind: always use fresh, high-quality ingredients. If your berries are mushy or starting to mold, they won't make good preserves. The quality of your final product is entirely dependent on the quality of what you start with. If you've been organizing your local Metcalfe garden, you'll have the best possible base for your jars.
The beauty of this process is that it turns a temporary abundance into a permanent pantry staple. There is something deeply satisfying about opening a jar of peach preserves in February and being reminded of the warm Ontario summer.
Steps
- 1
Gathering and Cleaning Your Harvest
- 2
Sterilizing Your Glass Jars and Lids
- 3
Preparing the Fruit or Vegetable Mixture
- 4
The Water Bath Canning Process
- 5
Cooling and Checking the Seals